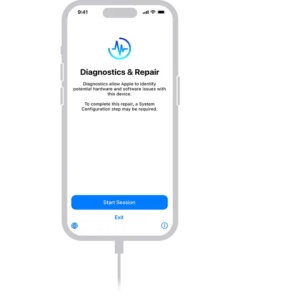
Putting your iPhone in Diagnostics Mode can be a useful troubleshooting tool to identify and resolve hardware or software issues. Whether you’re experiencing poor performance, battery drain, or problems with specific functions like Wi-Fi or Bluetooth, diagnostics mode can help you quickly assess and fix potential issues.
In this guide, we’ll walk you through the steps to enter Diagnostics Mode on your iPhone and explain how it can help you diagnose problems with your device.
How to Put Your iPhone in Self Diagnostics Mode
If you repair your iPhone using Self Service Repair, you might be asked to put your iPhone in diagnostics mode as part of the System Configuration process. The following steps show you how.

- Step 1: Turn off your iPhone like so: Press and hold either volume button and the Side button until the power-off slider appears on the screen.
- Drag the slider and wait for your device to turn off.
- Press and hold both the volume up and volume down buttons.
- With both volume buttons still held down, plug your Lightning cable into your iPhone and connect it to a power adapter or a computer.
- Release the buttons when the Apple logo appears.
- When a message appears saying “Diagnostics allow Apple to identify potential hardware and software issues with this device,” tap Start Diagnostics.
Diagnostics Mode is accessible primarily through Apple’s internal tools, but some users have managed to access it via third-party apps or through Apple’s online diagnostic tool.
Other Methods :-
1. Run Diagnostics via Apple Support
- Contact Apple Support: The easiest way to access Diagnostics Mode is by reaching out to Apple Support. They can run a diagnostic test on your device remotely, which will provide detailed feedback on your iPhone’s condition.
- Use Apple’s Support App: The Apple Support app also provides options to run diagnostics. If you’re unable to make it to a Genius Bar, use the app to schedule a service appointment or get remote diagnostics.
2. Use Apple’s Online Diagnostic Tool
If you’re having specific issues, you can also use Apple’s online diagnostic tool:
- Visit Apple’s website and go to the support section.
- Enter your iPhone’s serial number or sign in with your Apple ID.
- Follow the prompts to run diagnostics, and Apple’s system will assess your iPhone for any issues. You will receive a report with potential fixes.
3. Perform Basic Troubleshooting Before Diagnostics
While Diagnostics Mode is helpful for more in-depth issues, always try basic troubleshooting steps before seeking diagnostics:
- Restart your iPhone: This can often resolve minor software glitches.
- Update iOS: Make sure you’re using the latest version of iOS, as updates often contain bug fixes and performance improvements.
- Check Battery Health: Go to Settings > Battery > Battery Health to check if your battery is in good condition. If it’s significantly degraded, consider replacing it.
- Free Up Storage: Clear cache and unnecessary files to improve overall performance.
What to Do After Running Diagnostics
Once you’ve run Diagnostics Mode and identified potential issues, here are some next steps to consider:
- Contact Apple Support: If the diagnostics reveal major hardware or software problems, it’s time to get in touch with Apple. You may need to visit an Apple Store or Apple Authorized Service Provider for a more thorough diagnosis and possible repairs.
- Repair or Replace Faulty Components: If your diagnostics report shows issues like a damaged battery, malfunctioning camera, or broken display, you may need to get those components repaired or replaced.
- Update Software: For software-related issues, Apple may suggest an update or a factory reset as a fix.
- Backup Your Data: Before taking your phone to a service center or performing any reset, back up your iPhone data to iCloud or iTunes to prevent data loss.


